Those who have a coffee machine at home may undoubtedly prepare excellent cups of coffee for a new day full of vitality. However, in addition to drinking coffee, cleaning the machine to maintain the quality of your coffee and your health is critical. As you surely know, if you don’t clean and sanitize your coffee machine on a regular basis, it can accumulate and develop bacteria that are harmful to your health and have a bad impact on the quality of your coffee.
Keurig is one of the most well-known and widely used coffee machines in the United States, but not everyone knows how to clean it. So, how to clean reusable Keurig coffee filter, as well as the machine itself? Let us investigate the answers in this article.
Why Should A Keurig Coffee Filter And Other Parts Be Cleaned?
Every coffee machine is made up of a variety of components that are put together. Therefore, you’ll have to learn how to clean such parts properly to make sure the machine works well all the time.
The reusable K-cup filter is one of the removable elements of the Keurig coffee machine that requires frequent cleaning. They are available in various sizes, forms, and materials. You might use disposable plastic cups, which are inexpensive and can be purchased in bulk and then thrown away, but they will not work and are not environmentally friendly at all.

Coffee enthusiasts frequently choose eco-friendly reusable k-cups for their Keurig coffee makers. These cups are simple to use, environmentally friendly, and simple to clean. This k-cup can easily be filled with coffee grounds and then used in your Keurig coffee machine.
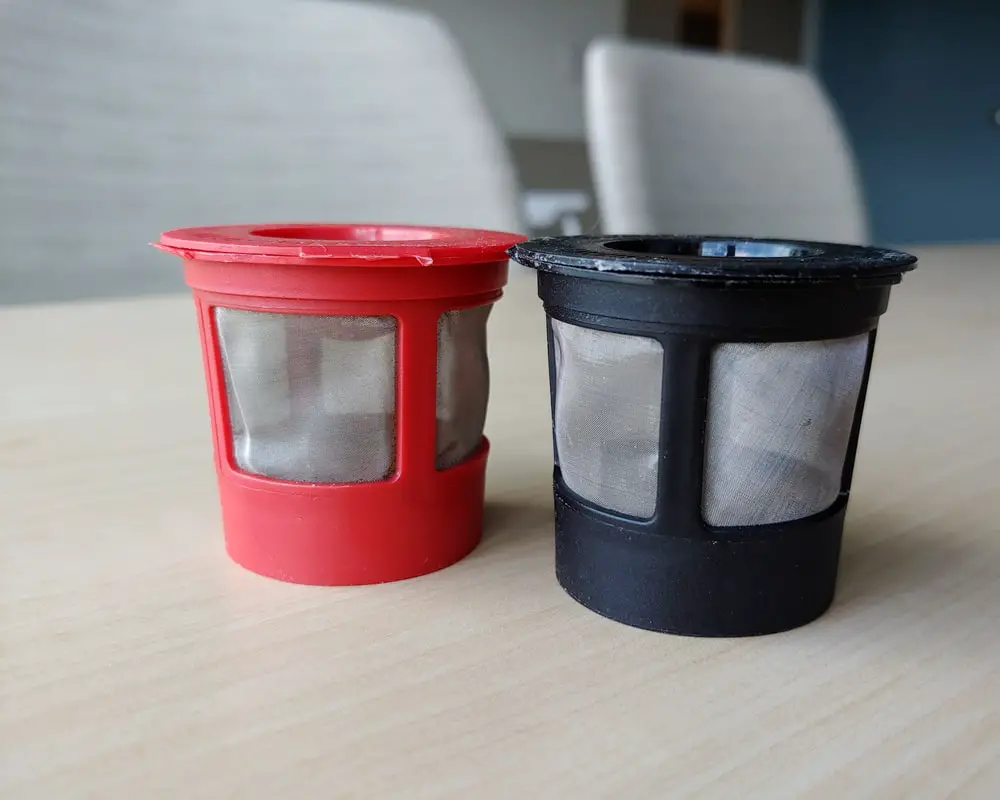
When utilizing reusable filters, however, individuals must be sure to clean them often and thoroughly, otherwise, they may amass hard water, mildew, and hazardous germs which are harmful to your health. Moreover, the water flow might be blocked off as the coffee grounds descend to the bottom and obstruct the exit needles, halting the coffee brewing operation. In the worst-case scenario, the oil will build up, leaving your coffee bitter or scorched. As a result, cleaning your reusable K cup on a regular basis, preferably once or twice a week, is of great necessity to avoid losing the flavor of your coffee and contaminating your body with bacteria.
How To Clean A Keurig Reusable Filter?
Many people believe that cleaning the coffee machine will take a long time, but it actually only takes 30 to 45 minutes. This is a vital duty to keep your machine in good operating condition and to always enjoy wonderful cups of coffee.
Your top priorities should be cleaning the drain needle, the reusable coffee filter and the water tank. Depending on the mineral concentration of the water in your location, you should also descale your machine every 3 to 4 months.
Make sure to rinse the pitcher and refill it with new water every morning if you want your coffee to have the greatest flavor. Every two months or after 60 times replenishing water, the water filter should be replaced. Additionally, you should cleanse the water tank thoroughly with mild soap at least once a week. By doing so, your morning coffee will obsivously taste better.
During the cleaning procedure, mild soap, vinegar or other detergents, water, a clean, dry towel, a toothbrush or tissue, and a paper clip will be needed. Once you’re ready, follow these instructions, keeping in mind that be careful at all times as some parts are pretty sharp.
Xem bài viết này trên Instagram
- Step 1: Disconnect the machine.
- Step 2: Remove the drip tray and water tank, and wash with a light detergent before rinsing. To ensure that there is no mucus or mold development, clean the valve at the bottom of the tank and the machine where the tank is placed.
- Step 3: Remove the K-cup holder and diffuser to clean the K-cup holder and exit needle. To separate the compartment and the case, press the buttons on the K-cup holder. Then, to clean the K-cup filter, follow these simple instructions:
- Take the K-cup filter out of your Keurig machine and discard any leftover coffee grounds. You may use them in your garden since coffee’s nitrogen slowly seeps into the soil, promoting plant development.
- Hold it under running water and let any remaining water drain out.
- Following this, place the k-cup in a big container combining white vinegar and water in a 2: 1 ratio.
- Soak it for around thirty minutes in the liquid.
- Remove the filter from the vinegar mixture after thirty minutes and wash it with warm water. Before replacing the grounds and reinserting the K-cup filter into the machine, make sure it is totally dry in the air.
After cleaning the filter, use a paperclip to remove the dirt and residue from the bottom drain needle, followed by a rinse with water. You should clean the exit needle at least once a month.
- Step 4: Use a toothbrush or paper towel to remove any residual coffee grounds or debris from the device, particularly around the top exit needle and handle. With a moist towel, wipe the rest of the gadget. Return all previously dismantled parts to the machine.
- Step 5: Fill the bucket with water and run a few brewing cycles without putting the case into the machine to wash.
Is It Necessary To Descale Your Keurig?
Descaling is required because it removes mineral buildup from inside your machine and allows it to operate more effectively. Depending on the mineral concentration of the water in your location, descaling should be done every 3 to 4 months. Besides, if the touch screen for the dispenser shows that it needs to be descaling, you should also do so.
What should I use to descale? Keurig may be descaled with vinegar or a commercial descaler. If you’re concerned about germs and yeast, white vinegar is a good option, but industrial descalers are far more effective at removing mineral deposits.
You’ll require the following: A descaler, a big cup/bowl, and water (like vinegar or a commercial descaler).
Xem bài viết này trên Instagram
- Step 1: Remove the water filter and switch off the dispenser after emptying the water tank.
- Step 2: Fill the container with 1 bottle of descaling solution and about 15 ounces of water, then turn on your dispenser.
- Step 3: Fill the drip tray with water, open and close the handle without adding the case, and push the brew button. For the Keurig K250, use the 6-ounce setting; for the K350, K450, and K550, use the 10-ounce setting. Wait until the solution is evenly distributed before discarding the liquid in the cup.
- Step 4: Continue rinsing until the brewer says “please add water.” Allow at least 30 minutes for the pot to incubate before turning off the machine. Then you pull it out and rinse it with all of the water.
- Step 5: Fill the container only a few times with clean water, then set the cup or pitcher on the drip tray. Rinse and repeat the brewing stage until one container is empty, then replace just with new water by pressing the brew button.
- Step 6: Finally, wipe the gadget off with a moist towel and wash any detachable parts with mild soap liquid before replacing them.
When descaling with vinegar, fill around 2/3 of the tank with white vinegar and the remainder with water to the MAX mark. Follow the same technique as above.
Final Thought
Cleaning the K-cup reusable filter of the Keurig coffee maker as well as the rest of the machine may appear difficult at first, but it only takes a few times to get accustomed to, isn’t it? It is vital to have tasty and high-quality cups of joe for your days. Thank you for reading this post and see you in the next ones.
